In this article (click to jump to each section):
- What is Muse, and how does it relate to Unlimited?
- Joining the session through your browser
- Joining with the Muse app
What is Muse, and how does it relate to Unlimited?
Musiversal allows you to collaborate remotely with musicians, producers, and engineers. During your sessions, you can:
-
Listen to your track as it’s being worked on
-
Watch the musicians record in real time
-
Chat and exchange feedback instantly
To make this possible, Musiversal uses an external tool called Muse.
Muse works like a video call platform (similar to Zoom) but offers one key advantage: it can stream high-quality audio directly from the musician’s DAW.
When you receive a Muse link, it connects you with the musician for your session, outside the Musiversal platform. You can join either:
-
Through your web browser, or
-
Via the Muse desktop app
Joining the session with your browser
Best practices:
-
- Chrome ✅ (most recommended) - Download Chrome here.
- Safari ✅
- Firefox is not supported ❌
- Use Headphones - Speakers can cause a feedback loop with your microphone, creating an undesired echo.
- Fast Internet - A strong, stable connection is key for smooth audio streaming.
How to join your session
From the homepage, when it's time for your session, click "Join Now" (the link will show 5' prior)
Or click "Join Livestream" in the session's page:
⬆️
Main Settings
After clicking on the joining link, a new tab will open in your browser, and you'll be directed to this screen. Here, you'll be able to enter your Name and select your Microphone, Speaker and Camera:
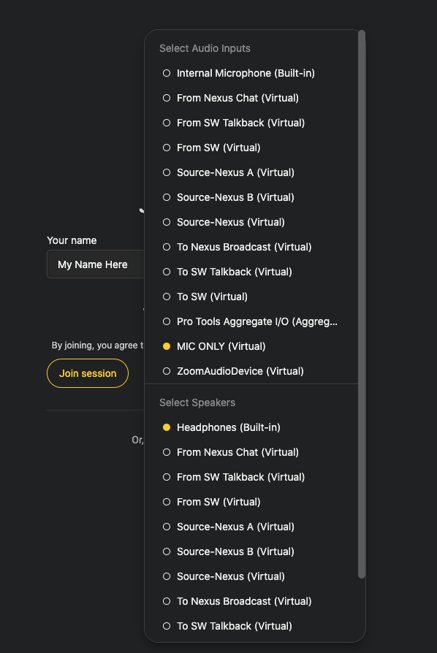
There's a level indicator on the Microphone input, so you can now see if your microphone is working properly before joining the session:

You can select the speaker, and also test it

Once you've selected your devices, click on "Join session"

Alternatively, you can also choose to join via the Muse app. Learn more about this here

You'll be placed in the waiting room, for the musician to admit you as soon as they're ready:

In the session's room
Once you're in, it will look like this:

By default, you'll see the musician's shared screen as the main "big” image on the left, with you on the top-right, and the musician on the bottom-right.
If you'd prefer to have the musician's camera as the "big" video, click the “…” on their camera view and select "Pin Video".

On the bottom right of the screen, you'll see the chat, which you can use to exchange written messages:


Additional settings
• Manage volume or solo the musician's stream with the control module below your image

• Toggle your camera and mic on/off by clicking on the icons at the bottom of the main screen

• Click on the arrows next to each icon to display their options

5. To leave the session, click on the red "Leave Session" button

You'll be shown this warning but don't worry, your session video will be saved to our system shortly after you leave the room.

When to use the Muse app
We suggest you download the Muse app when:
- You don't use any of the recommended browsers
- You're having issues with your Muse sessions, unrelated to your connection's speed: they chop, freeze, have problems with image, etc.
- You prefer the desktop experience
How to install and use the Muse app
Download from here
Watch the video to find out how it works ⏬
Muse's Help Center and website
If you still have questions, visit Muse's Help Center for additional information.
Also, you can visit their status page here.
Your Music, No Limits

Need help? Contact us to get personalized Support.